Monday, February 25, 2013

Chocolate....

Yesterday I got to spend the day in a room filled with Hawaii's top chocolate growers, makers, and lovers at the Hawaii Chocolate and Cacao Association conference and annual meeting.

I accepted an invitation to attend the meeting thinking it would provide the inspiration I'm looking for to create my next chocolate concoction.  I was beyond inspired and happy to learn all I can about any ingredient, especially chocolate!  To sit in a room listening to the ideas and issues surrounding chocolate production from grower to chocolatier was very interesting.  I took a lot away from the day and would like to highlight a few things that stuck with me.

The chocolate industry is just beginning in Hawaii and this group of cacao growers and chocolate makers have big plans for the long term future of Hawaiian chocolate.  I was amazed to hear about the costs of growing chocolate and the risk a farmer takes by planting this fragile crop and the long time frame they're looking at before #1) knowing if their crop creates chocolate that tastes any good and #2) making any profit off the harvest of trees planted up to 4 years prior!  Keeping this long term commitment of the farmer in mind imagine the fear of a chocolate pest infestation in Hawaii.  This topic came up a few times and educating the public is imperative to the health of the chocolate industry, and part of the HCCA's mission.  Read more in their newsletter:  PLEASE DON'T SMUGGLE PODS.  Further, if you go on vacation to a place that grows cacao, visit a cacao farm, or come in contact with cacao in another chocolate growing country please be careful not to smuggle cacao pests back to Hawaii.  Burn your clothes and shoes!  Hawaii grows only a tiny percent of the worlds chocolate and the future of Hawaiian chocolate is bright; it could all be ended by one tiny pest stowaway.

Another topic that was of interest to me was the diversity of chocolate in Hawaii.  I personally believe terroir absolutely has an affect on the flavor of chocolate as well as variety and of course fermenting and drying (the #1 time in the life of the cacao the the flavor can be made or ruined).  Previously it was believed that there were only 3 varieties of cacao:  criollo (an inbred pure cacao from ancient times believed to be the best by some, others believe its comparable to a purebred dog and carries health issues that make it weak), forestero (another ancient variety grown mostly in Africa known for its high yield), and triniterio (a hybrid of the two, or any shade of grey).  I learned yesterday that there are many more than just the three and that new species are being discovered in the depths of the jungles in central and south America more and more.  Hawaii has many of these varieties including some ancient species and many micro climates among the islands to grow very diverse and unique chocolates.  Therefore there should be appellation control of cacao in Hawaii...I loved this discussion and wholeheartedly agree.  This got me thinking about an appellation specific dish, chocolate grown on the Hamakua coast sweetened with vanilla and honey from the same coast, maybe pair it with lilikoi, coconut, macadamia nuts, Suriname cherries or any other crop that also grows nearby.  Plate it on Koa wood...now I'm getting carried away.

Although I got to taste some chocolates from all over the world at the end of the day I was left with a huge craving!  Luckily I am going to be testing recipes over the next week for my new spring menu chocolate dessert at work...looking forward to that!  I'm also working on a presentation for the Big Island Chocolate Festival next month, until then.....


Tuesday, February 19, 2013

Honeydew and Poprocks.

So this was my favorite dessert ever invented to date...don't know why it took me this long to write about it but we're coming into springtime when the flavors are again becoming relevant (though one could argue that this is a perfect year-round dessert, especially in Hawaii)

Here's the description, long form...here we have some fresh Maui pineapple and honeydew brunoise topped with fresh coconut sorbet, honeydew foam, and sweet tea ice; surrounded by Frankie's Nursery Meli Kalima pineapple jelly and ginger popping sand.  Suggested eating:  sweep the sand into the middle of the plate and eat everything together.  Summertime in a plate.

The most interesting component of this dish is the inspiration.  I started with a tiny Parisian scoop (melon baller) and wanted to incorporate tiny melon balls into a dessert (a component which I've used in an amuse bouche at a previous restaurant).  I ended up with a honeydew melon soup which a coworker remarked reminded them of the honeydew melon flavored sodas and ice cream bars popular in Japan.  I had never heard of such things so I looked them up...honeydew soda floats????...think root beer float but vanilla ice cream and honeydew Fanta, what the crack!?

Reading more into this unfamiliar flavor combination I found people adding flavor descriptions such as ginger and ice tea...hmmm.  So I ditched the tiny melon balls (an idea to be resurrected at a later date for sure) and leaned toward soda float.

I always try to have a vegan dessert option on my menu so my first adaptation was easy, sub coconut sorbet for vanilla ice cream.  Coconut is one of my favorite fruits to make into a sorbet because it naturally makes such a creamy product it is almost like ice cream.  The recipe is simple...

Coconut Sorbet
3 cups fresh frozen coconut milk (Hawaiian Sun)
1 cup sorbet syrup (3lb sugar, 32fl oz water, 8oz glucose syrup; bring to a boil, remove from heat, strain, cool.  recipe from Baking and Pastry Mastering the Art and Craft, CIA)
Salt, to taste

Combine all ingredients and spin in ice cream machine, store in freezer for further use.

You know when you make a root beer float and you get crispy bits of foam around the edges.  This is my favorite part of the float and I had to recreate it in my melon soda float dessert.  I simply brewed a good strong English Breakfast Tea and added an equal part of simple syrup then froze the sweet tea to be scraped into a granite with a fork come serving time.

I decided to make a honeydew melon foam to emulate the float using an iSi canister and NO2 charges.  There's no recipe for the foam, combine honeydew with enough almond milk (keeping the vegan option while adding enough fat to make a foam) to the canister of a heavy duty blender to make a smooth puree.  Strain through a chinois and add enough Midori extract (bring the midori to a boil to cook out the alcohol) to have a strong melon flavor.  Blend in xanthan gum to thicken without making too gummy (remember this is all to taste, sorry, no recipe!).  Add the melon puree to the iSi canister and charge to consistency with NO2 cartridges.

For the ginger popping sand I made a vanilla sable crumb, candied ginger brunoise, and plain pop rocks around the edge of the plate.  Place a quenelle of brunoise pineapple and honeydew melon, top with a quenelle of coconut sorbet, honeydew melon foam, and a bit of sweet tea ice. Voila!


Monday, October 1, 2012

Mochiko Cupcakes...

I recently had to come up with a dessert recipe using rice for Honolulu's 3rd annual Rice Festival.
Coconut Mochi cupcakes with Pumpkin frosting and crispy rice brittle


Chef Mavro and I got to demonstrate how to to make the Coconut Mochi cupcake recipe that I chose as one of the 'celebrity chef' appearances along with Hawaii News Now's Stephanie Lum and Shawn Ching...
We had a lot of fun and I wanted to share the recipe...

Coconut Mochi Cupcakes (makes 5 dozen mini cupcakes)
1 lb Mochiko sweet rice flour
1 1/4 cup granulated sugar
1 tsp baking powder
1/2 tsp kosher salt
3 each eggs
1 1/2 cups rice milk
3/4 cup coconut oil

Preheat oven to 350 degrees F and line mini muffin pan with paper liners.  

In a large bowl combine the rice flour, sugar, baking powder, and salt.  In another bowl combine the eggs, rice milk, and coconut oil.  Pour the egg mixture into the rice flour mixture and mix thoroughly with a whisk.  The batter will be stiff, keep mixing to combine well.  

Transfer batter to a piping bag and fill the mini muffin cups 3/4 full.  Bake about 20 minutes until golden brown.  Remove from pan and let cool on wire rack.  


Top the cupcakes with your favorite frosting.  I used a Pumpkin Cream Cheese frosting recipe that I found online and garnished it with a bite size crispy rice brittle.

Took my favorite peanut brittle recipe and in the spirit of Rice Fest substituted crispy rice cereal for the peanuts...

Chef Mavro and I prepping for our
Rice Fest demonstration.
I'm breaking up the
brittle into pieces.  
2 cups granulated sugar
1 cup light corn syrup
1/2 cup water
1/4 cup butter
2 cups crispy rice cereal
1 1/2 tsp baking soda 
1 tsp vanilla

In a large pot combine the sugar, corn syrup, water, and butter.  Cook, stirring frequently, over medium heat to 275 degrees F (use a candy thermometer).  Add the crispy rice cereal and continue cooking, stirring constantly to 300 degrees F.  Add the baking soda and vanilla and mix just to combine.  Pour onto a lightly greased 9 x 13 inch baking sheet and spread evenly.  Allow to cool before breaking up into bite size pieces.  

I was surprised how great these cupcakes turned out.  They were nice and crispy on the outside and had the familiar chewiness of mochi on the inside.  The combination of coconut and pumpkin was an interesting fall flavored treat with a tropical twist.  Hope you enjoy the recipe!

and although it's embarrassing to see myself on the stage with a microphone I'll share this clip with you:)

Monday, September 3, 2012

Candied Kaffir Lime Leaves...


Kaffir lime leaves are a popular ingredient in Southeast Asian cooking.  Commonly found in curries, these flavorful leaves add a distinct flavor reminiscent of fruit loops.

I used these on a dessert last winter, paired with a fresh coconut mousse, calamansi cherry coulis, almond ice cream, and candied almonds.  My original thought was candied lime zest of course but necessity is the mother of invention and we had a bagful of lime leaves in the freezer that couldn't go to waste so I decided to try my usual citrus candying technique on the leaves.  The result was unbelievable!

I always start by washing thoroughly the leaves, then julienne the leaves.  When using citrus peel you carefully remove the peel from the fruit with a vegetable peeler making sure not to take any pith, julienne  the peel.  Citrus peel can be so bitter that it is best to blanch the peels three times, using fresh water each time before candying.

Kaffir lime leaves can be bitter also, as well as chewy, so I modified the technique to account for this.  Combine equal parts sugar and water in a small sauce pan and bring to a boil.  The amount of syrup you must make depends on how many leaves you'll be candying, you need enough to cover the leaves.  At least one cup of sugar and water should be used so you have enough liquid to proceed.

Add the julienne lime leaves to the boiling sugar syrup, boil for one minute and then remove from the heat and let sit for 15 minutes.  Return to the heat and bring to a boil; again boiling for one minute and standing off the heat for 15 minutes.  Repeat this process one more time.  The purpose of the triple boiling is to remove bitterness and to bring out the fruity lime flavor of the leaves; as well as to tenderize them so they are not chewy.  After the third boil taste one of the leaves, if it is still bitter you can repeat the process one more time.  If the leaves taste sweet and fruit loop lime flavor then return to a boil and testing with a candy thermometer bring the syrup to 130 degrees F.

Once 130 degrees is reached remove the lime leaves from the syrup using two forks and toss in granulated sugar in a shallow pan.  Use the forks to separate the pieces and coat in sugar.  Remove the lime leaf pieces from the sugar and transfer to a clean baking sheet and let cool.  The leaves should become crispy once cooled.  The result is a crisp, sweet, fruity product that is easy to eat and can be added to many desserts to add an intense lime flavor.

Fresh Coconut Mousse, Calamansi Cherry Coulis, Almond Ice Cream,
Candied Kaffir Lime Leaves, and Candied Almonds
Photo Credit:  Will Blunt, Starchefs.com 

Monday, August 27, 2012

White Chocolate Avocado Cremeaux

White Chocolate Avocado Cremeaux
served with spiced chocolate sauce, raw Hawaiian chocolate mousse, 
corn financier, lime oil, basil syrup, cocoa nibs


For the avocado puree...

Start with four perfectly ripe, medium size hass avocados and four limes.  Split the avocado, remove the pit, then remove the fruit from the avocado into a bowl.  Squeeze the juice from three limes over the avocado and toss to coat.  The lime juice is necessary to preserve the green color of the avocado and also contribute to the flavor of the finished dessert.  


Using a bowl scraper push the avocado fruit through a fine tamis into a bowl (pictured left) to create a smooth puree (pictured right).  This method helps to remove any brown fibers from the fruit.  

Stir the puree to combine thoroughly all the fruit and lime juice, taste for flavor, you should first taste avocado and the lime will follow.  If there is no hint of lime, squeeze half or all of the 4th lime into the puree, combine and taste again.  


Cover the puree directly with plastic wrap to prevent oxidation, reserve in the refrigerator until ready to use.  

 
For the cremeaux...
Carefully and accurately scale all ingredients:
200 grams whole milk
40 grams granulated sugar
80 grams egg yolks
200 grams white chocolate (Cocao Barry)
10 grams sheet gelatin
500 grams avocado puree
Kosher salt, to taste

Bloom the sheets of gelatin in ice water until softened.  Have the white chocolate ready in a medium mixing bowl and a fine chinois.  

In a small pot bring the milk to a simmer.  While waiting for the milk to simmer combine the sugar and egg yolks in a small bowl and whisk to create a light foam.  Temper the egg mixture into the milk by first pouring about half of the simmering milk into the bowl, whisk to combine.  Return the contents of the bowl to the pot and cook, stirring constantly until custard is thickened; while trying not to curdle the eggs.  


Immediately pour the cooked custard through a fine chinois over the white chocolate and stir to melt the chocolate.  Once all the chocolate is melted squeeze all of the water out of the gelatin sheets and add to the white chocolate mixture, mixing to combine.  


finished cremeaux...
Allow the mixture to cool to about room temperature.  Scale 500 grams of the reserved avocado puree.  Add the puree in thirds to the custard mixture and whisk to combine.  Add a large pinch of salt and taste for flavor.  You should first taste avocado and white chocolate, the flavor should finish with lime and should not be bland.  You will know when there is enough lime and salt so keep adding if it's not there yet.  All the flavors come through at different times in each bite but they are all present.


Place the cremeaux into a piping bag and pipe into 40 financier molds, level and smooth.  Cover the finished cremeaux directly with plastic wrap and freeze until set.  The cremeaux can now be removed and two pieces sandwiched together to form a hexagon.  

The white chocolate avocado cremeaux is served with a dark chocolate sauce spiced with Thai bird chiles and cinnamon; a corn financier; raw Hawaiian chocolate mousse (Madre Chocolate, 70%); lime oil; basil syrup; and cocoa nibs.  

This dessert was inspired by the ripe avocado.  Looking for a summertime chocolate dessert I decided to finally try using avocado in a dessert, something I've been contemplating for a while.  The lime flavor was second to present itself, making sense since I needed a way to preserve the color of the avocado and it is a classic flavor combination.  In thinking about which application to choose to present the avocado I thought about a white chocolate mousse recipe that I've used in the past.  I first decided to add white chocolate to the recipe in order to keep the avocado recipe relevant in a chocolate dessert.  Once I experimented the recipe the flavor combination made perfect sense.  

In trying to come up with other components to go with the dessert I thought about classic flavor combinations with avocado...corn, and spice.  I liked the idea of using a financier mold for the cremeaux and loved the idea of pairing a financier as a cake-like component in the otherwise all mousse-like textured dessert.  So I took my favorite financier recipe and substituted cornmeal for the hazelnut flour, leaving the brown butter and honey which also made sense in the dessert.  

The spiced chocolate sauce is simply my favorite basic dark chocolate sauce recipe infused with Thai bird chile and cinnamon. 

The chocolate mousse adds richness and bulk to the dessert.  When I tasted the raw Hawaiian chocolate from Madre Chocolate here on Oahu I knew it was an automatic match for this dessert.  The flavor of the chocolate is so distinct and unique and the nutritional value and health benefits of raw chocolate were something I really wanted to add to this already nutrient rich dessert.  

Finally, olive oil is a component I've wanted to try in a dessert for a while and I also wanted to get basil into the flavor profile somehow.  I used Boyajan lime oil to infuse the olive oil with lime flavor and made a basil simple syrup to create a dessert "vinagairette" look on the plate.  

Overall I have been very happy with this dessert, it has been on my dessert menu at Chef Mavro Resaurant for the summer season and is about to retire as fall is approaching.  It was also featured in a starchefs.com photo gallery of food from the restaurant.

I hope you've enjoyed learning about this recipe and the inspiration behind the dessert, let me know if you try it out and how you like it!

Wednesday, December 14, 2011

Caramel Forelle Pear - A Hawaiian take on Pacific Northwest deliciousness

Here's the recipe description:
Oregon Forelle pear poached in Maui pineapple wine, dipped in a rich caramel glaze, served with Frankie's Nursery 'Meli Kalima' (Honey Cream) pineapple kanten, almond pear French macaron, and house made Maui Gold pineapple granité. Mouth watering???

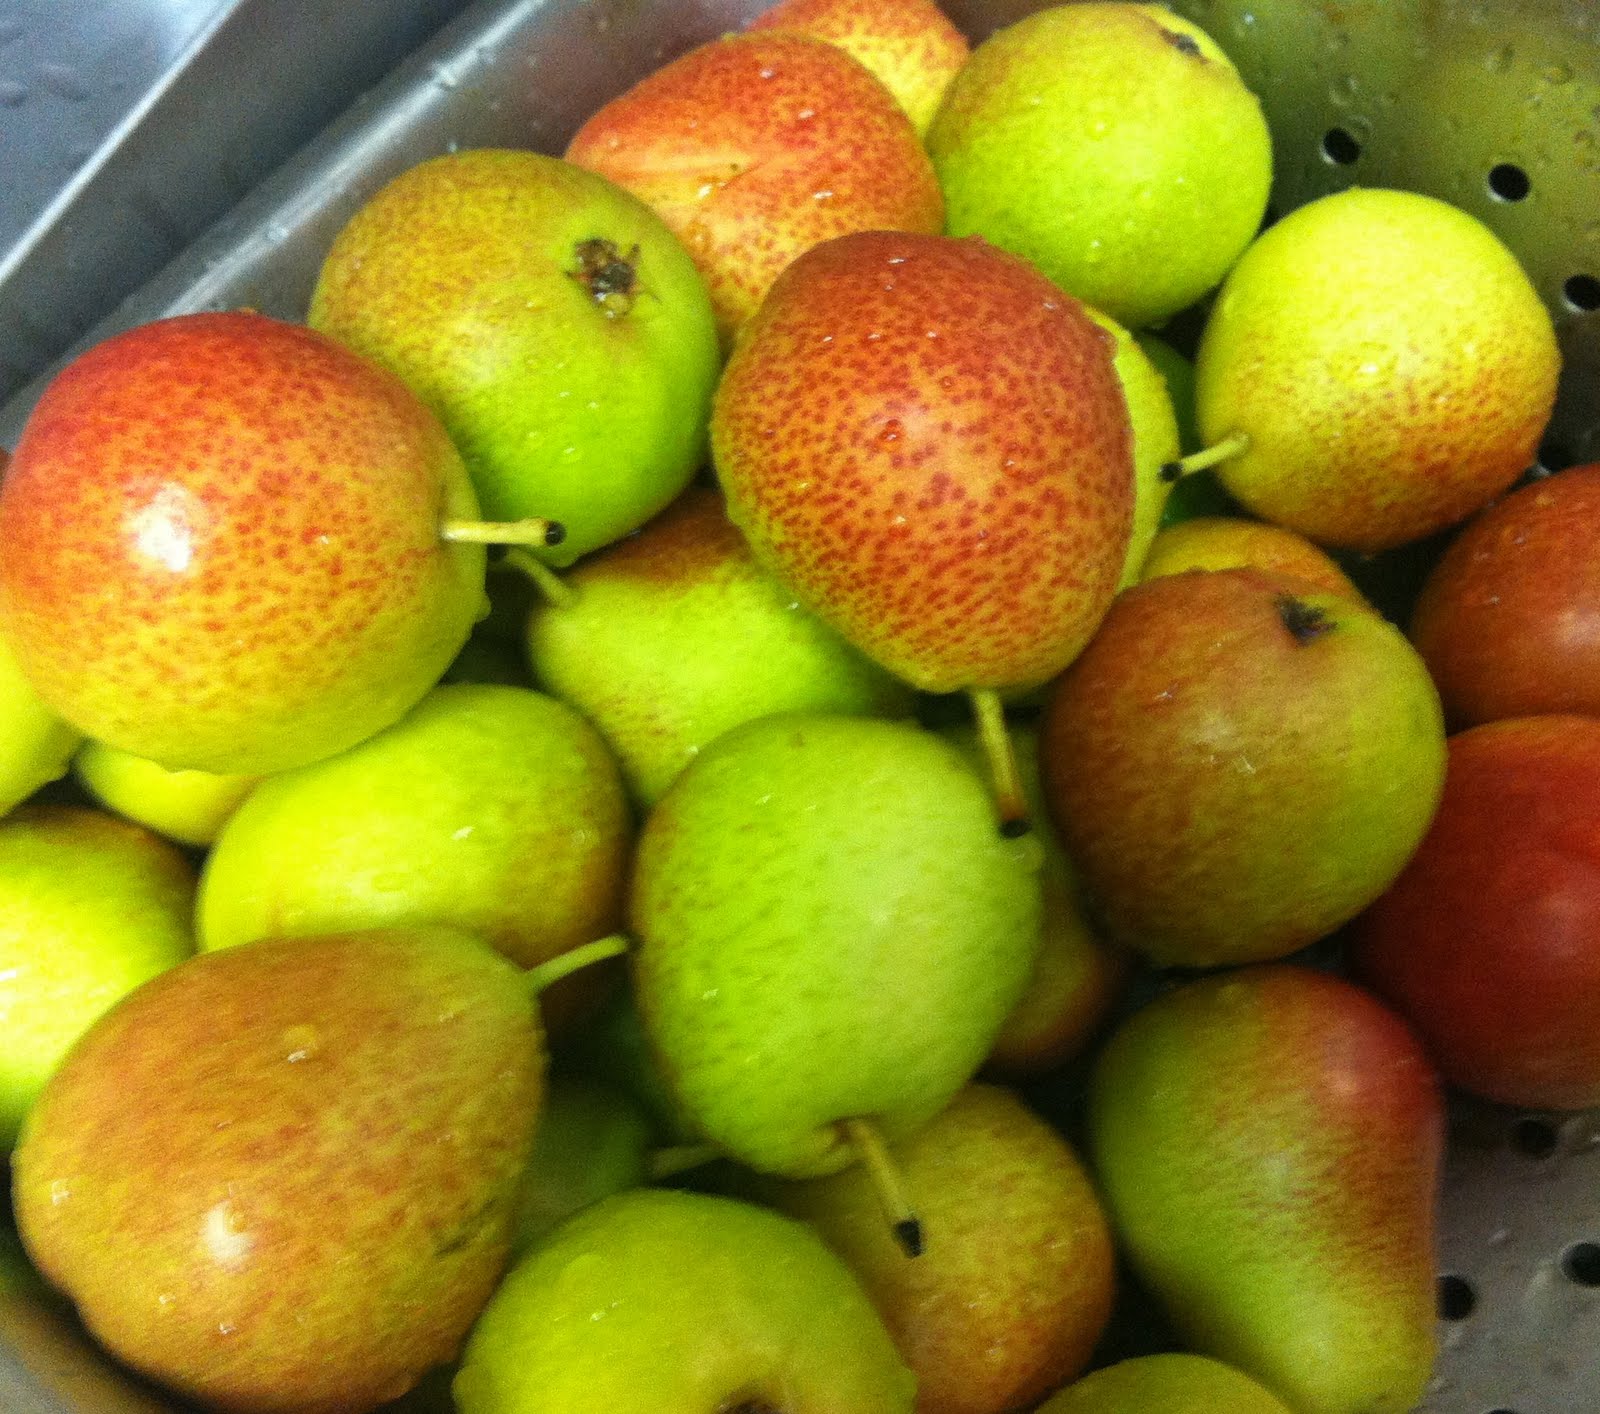
About the Forelle Pear...these beauties pictured left are from Oregon. They are distinguishable by their small size and red freckles which they develop as they ripen. These miniature pears are sweet, juicy, and have a spicy quality to them, especially when eaten with the skin on (which is where all the nutrients are anyway...don't know why you wouldn't!)

Those nutrients include vitamin C and insoluble fiber which will help keep you regular and is good for the colon.

I particularly love this pear because it is so cute!

We are in Hawaii these days so let's add a local component to this plate...Meli Kalima Pineapple

Sticking with the theme of miniature fruits I chose to utilize this unique pineapple. Frank Sekiya (of Frankie's Nursery up the way in Waimanalo http://www.frankiesnursery.com/) developed this
pineapple with a consistently high sugar content and creamy white color which is where it gets its name; 'Meli' describing the honey sweet sugar content, and 'Kalima' describing its creamy color and dense texture.

This pineapple is smaller than most but yeilds such a creamy, sweet fruit, I had to use it.

The Caramel Forelle Pear dessert is a quartet of items meant to showcase the pears and the pineapples. The components of each item are cross utilized to tie the quartet together and create a cohesive dish. Each component can be prepared and served on its own, or together offer a diverse utilization of two delicious fruits. The inspiration for this dessert came from many
places, beginning with the pear, trying to find a local wine to poach it in (resulting in the discovery of Maui's pineapple wines, thus pineapple was introduced), a visit to Frankie's Nursery tasting many tropical fruits including their invention, the Meli Kalima pineapple, a coworkers' trip to Japan and the kanten noodles he came back with, classic techniques and flavors
combined with new to me techniques and flavor pairings.

The recipes:

Pear Poaching Liquid

Start with a Maui pineapple wine, you'll find it undrinkable so
put it all in the pot and open a bottle of something good for the cook.
· 500 mL simple syrup (3 lb sugar, 32 fl oz water, 8 oz glucose or light corn syrup; combine ingredients in a pot, bring to a boil, remove from heat, cool and reserve in the refrigerator to use as needed or use right away) Baking and pastry : mastering the art and craft / the Culinary Institute of America. -- 2nd ed. p. 488.
· 750 mL pineapple wine
· 1/2 lemon, juice only

Combine all ingredients in a medium saucepot. Wash 6 pears and remove the core through the
bottom with a small melon baller, removing the seeds too, leave the stem on. Add the pears to the poaching liquid and bring to a simmer over low heat stirring occasionally to keep the pears turning over and cooking evenly. Simmer until pears are knife tender. It is very important that the pears are thouroughly cooked or they will oxidize from the inside out and your pears will
turn brown and look bruised. Remove pears from the liquid, let drain on a rack placed over a sheet pan in the refigerator.

Caramel Glaze (Baking and pastry : mastering the art and craft / the Culinary
Institute of America. -- 2nd ed. p. 426)

· 14 g Gelatin Sheets
· 425 g granulated sugar
· 30 mL lemon juice
· 300 mL water, divided
· 375 mL heavy cream
· 1 vanilla bean, scraped
· 1 pinch salt
· 28 g cornstarch

1. Bloom the gelatin in ice water.
2. Combine sugar and lemon juice and cook to medium amber color.
3. Slowly add 225 mL of the water, cream, vanilla bean, and salt.
4. Combine the cornstarch with the remaining water to make a slurry.
5. Whisk in the slurry and bring to a boil, remove from the heat.
6. Squeeze the water out of the gelatin and add the gelatin to the hot caramel mixture.
7. Strain. It is ready to use now or may be refrigerated and rewarmed for later use. Allow the glaze to cool slightly so that it will coat the pears. Dip each chilled pear into the caramel glaze and place on rack to allow excess to drip off. Move glazed pears to clean parchment lined
sheet pan and refrigerate until ready to serve, up to 12 hours.

The next component on the plate is the kanten noodle....these noodles are flavored with the Meli Kalima pineapple.

Kanten Noodles

· 1 cup Meli Kalima pineapple puree
· 1 cup used pear poaching liquid (after the liquid has been used to poach a batch of pears
it has picked up just a hint of the spicy quality of the pears and helps to relate the noodles to the pear)
· 1 Tbsp granulated sugar
· 1 heaping teaspoon kanten powder (a.k.a. agar agar)

1. Prepare a 1/4 sheet pan (9" x 12") by lining with plastic wrap.
2. Combine the pineapple puree and poaching liquid in a small saucepot and bring to a
simmer.
3. Stir together the sugar and kanten powder, add to the simmering liquids and simmer,
stirring constantly with a whisk for three minutes.
4. Pour the kanten into the prepared sheet pan and let sit until solid, keep
refrigerated until ready to use.
5. Cut the kanten into long strips, or square "noodles"
6. Serve noodles with chopped tarragon in a syrup made by reducing some of the poaching
liquid until sweet and the desired consistency.
Almond Pear Macaron

· 440 g tant pour tant (French for equal parts almond flour and powdered sugar)
· 40 g powdered sugar
· 210 g room temperature egg whites, divided
· 120 g granulated sugar

1. Combine tant pour tant and powdered sugar in the bowl of a food processor. Process to
further grind the almond flour and to thoroughly mix with the powdered sugar. Sift ingredients onto a sheet of parchment.
2. Whip 190 g of the whites to medium peaks, add granulated sugar and continue mixing
to stiff peaks. Add the remaining 20 g of whites at the end of mixing, combine by hand.
3. Fold in the processed and sifted dry ingredients in thirds being careful not to deflate
the meringue.
4. Pipe cookies on parchment lined sheet pans. Bake at 250F for 12 minutes, rotating
pan half way through baking.
5. Pipe pear jelly filling between two cookies to make a sandwich.

Pear Jelly
· 4 Cups Bartlett pear puree
· 5 Cups granulated sugar
· 2 Tbsp lemon juice
· 1.75 oz pectin

1. Combine puree, lemon juice, and pectin, bring to a full rolling boil, stirring constantly.
2. Add sugar and return to a full rolling boil for exactly one minute.
3. Remove from heat, cool.
4. Process jelly in food processor to create a light, airy, smooth consistency, transfer
to a piping bag to fill cookies.

Maui Gold Pineapple Granité

· Puree fresh Maui Gold pineapples and strain through a fine mesh strainer, add simple syrup (recipe included above in poaching liquid) and used poaching liquid (again to tie the flavors of the plate together), to taste.
· Store the base in a shallow container in the freezer. Stir mixture with a whisk every 30 minutes until it begins to form ice crystals. Continue stirring occasionally to keep the ice crystals small and uniform, the more you stir the better the texture of your final product will be.

So there it is, a complex dessert with many components that you might not ever attempt to make on your own but I hope you enjoyed learning how it is done in the professional kitchen. Here is a picture of the finished product...


This dessert can be found for a limited time (the 2011/2012 winter season) at
Chef Mavro restaurant in Honolulu....where I am the Pastry Chef:)

Wednesday, December 15, 2010

Cooking Quinoa for the first Organically Delicious Cooking Club feast...

Cooking Quinoa...
1 cup quinoa, rinse thoroughly to remove bitter residue on the grain.
2 cups water
Combine water and quinoa in a saucepan and bring to a boil. Reduce to a simmer and cook uncovered for 15 minutes or until all the water is absorbed. Turn off the heat, cover, and let stand for five minutes. When the quinoa is cooked each grain will have a little tail.
When I made my Curried Quinoa Vegetable soup I started with a veg stock, simmered carrot, onion, celery, garlic, tomato for 3 hours, strained, pureed the veggies. I added the quinoa to the puree, added some stock to thin, seasoned with salt and curry powder, and finished with Almond Milk. Voila...a totally gluten free and vegan vegetable soup packed with protien.

Day two: leftover soup was thickened as the quinoa absorbed even more moisture. So I heated it on the stove and let it reduce a little more. Made a white wine buerre fondue and poured that over the thickened quinoa in a bowl and topped with some shaved parmesean cheese...omg. The richness that only butter and cheese can add...glad I'm not vegan all the time!

Interested in the cooking club? Check it out on Facebook...